
I’m pleased to report that I finished the stitching for my Grandma’s 90th birthday card earlier this week (see A new blackwork project). Below is an image of what Rosa looked like before I embellished it with filling stitches and seed beads.

Initially, I had planned on using a combination of pink and silver for the filling stitches, until I remembered that I’d used up the last of my silver thread (I must remember to get some more). I knew that I wanted to incorporate metallic thread, and as I had an adequate supply of gold (DMC shade 5284) for my project, I opted for a gold and red colour scheme. I’ve had my gold thread for quite some time, so to clear up any confusion, I should point out that the shade is now known as DMC Light Effects E3852.
I decided that I would use gold thread for the centres of the teardrop shapes, and had thought of using a combination of gold and DMC shade 321 (red) for the rest of the teardrop shapes. The result looked absolutely dreadful, and the visual impact of the gold centres was lost, so I hastily abandoned that idea.
For the centres of the small flowers, I used gold thread and Mill Hill glass seed beads (shade 02011). I felt I wanted to use a slightly different shade of red for the petals, so used DMC shade 498.
After completing the filling stitches in the centre of the design, I thought I was done. However, when I sat back and assessed the overall look of my work, I had an overwhelming feeling that it lacked something.

I’d been looking at the border, pondering over what I could do with it. Suddenly, I had a flash of inspiration, and it became blindingly obvious. Recently, my friend over at EglantineStitchery had written about couching in a number of her posts, and having seen photographs of the results that can be achieved with couching, I thought I’d give it a try.
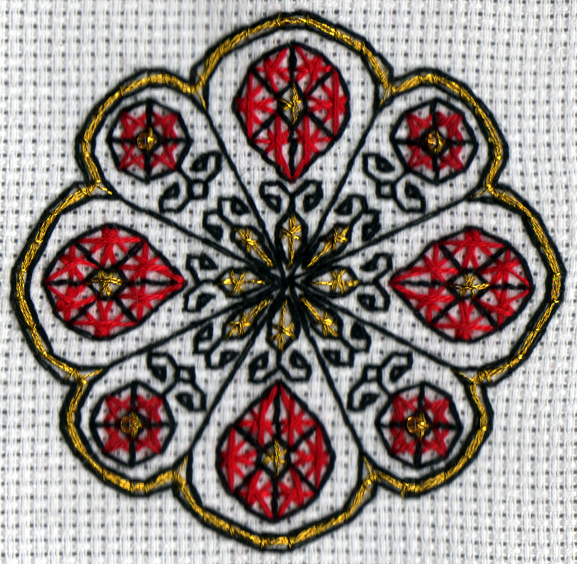
For a first attempt, I have to profess I feel quite proud of myself. In my opinion, the couching was precisely what was required to make my piece look truly complete, and give it the wow factor.
Seeing as the video for my previous Blackwork birthday card (see Blackwork Birthday Card) was so warmly received, I thought I’d try my hand at creating what I consider to be a slightly more professional-looking video. I must forewarn you though that the video is quite lengthy. In addition, the quality of some of the images is far from perfect, as they look slightly blurred in places.
I trust that you were able to view the video without any problems, as I recently attempted to upload it to Facebook and received a Notification of Alleged Copyright Infringement.
Anyway, having completed the stitching, my next task was to wave a magic wand and… [Cue drum roll] Ta-Dah!
Anyway, having completed the stitching, my next task was to wave a magic wand and… [Cue drum roll] Ta-Dah!
 |
| Front of card |
 |
| Inside of card |
 |
| Back of card |
6 comments:
Absolutely Gorgeous Finish CS!
I'm totally blown away by your choice of filling stitches and colours - the rich red and gold against the black looks so very lavish and decadent. It reminds me of those beautiful Japanese lacquered boxes you sometimes see (like this and this).
Bravo for trying out couching! It looks stunning (LOL), and that extra bit of gold is indeed the perfect finishing touch! I hope that you enjoyed working the stitch - it's really addicting isn't it? I've been pouring over the enlarged photo, and am marvelling at how you got your tacking stitches so neat and even! Wonderful work!
And I love your video! I don't use Facebook myself, so I have no idea what went wrong there, but I was able to view it fine (I even enlarged it to full screen), and I can't tell you how much I enjoyed watching your stitching progress step by step immensely! You put together a great presentation ;)
Your Grandma will have a lovely and unique heirloom card to treasure! I'm sure she'll love it very much :)
Wow, the card is just stunning! It's such a beautiful design to start with, but the filling stitches and the red and gold make it absolutely gorgeous! And the couching really is the perfect finishing touch! You really should feel proud of yourself, and I'm sure your grandma is going to love it! :)
Love the video too by the way - and it worked absolutely fine for me!
The process of watching the card take shape is such a brilliant idea. The card looks amazing. So much thought, time and effort. Grandma is going to be very pleased with it and show it off I am sure.
Crazy Stitcher Mother.
Thank you so much for your lovely comments about the card, my stitching, and the video. They have made my day! :-D
Although I enjoyed the couching, I will admit that I found it a little fiddly. I used three strands of thread, which were considerably longer than they needed to be. Deciding where to place the tacking stitches (using one strand) was easy, but making sure they were within the border required plenty of concentration.
As for the video, I'm just as pleased with that, as I am with the card. Because of what had happened with Facebook, I had decided to err on the side of caution, and make a second video without audio. I've a feeling it may have been the audio that Facebook had an issue with.
Aurelia - I had a look at those links you supplied, and have to say I'm very taken with the second image. :-D
Hi
This is my first visit to your blog but I absoultely adore the card you have made for your grandma.
It was great to see it take shape through the different stages.
Congratulations, see you soon!
Shebafudge - Thanks for your lovely comment. My Grandma was quite taken with the card too. :-D
Post a Comment